Hey there! As a supplier of Dredging Rubber Hoses, I've seen firsthand how important it is to install these hoses correctly. A proper installation not only ensures the efficient operation of your dredging equipment but also extends the lifespan of the hose. So, let's dive into how you can install a dredging rubber hose correctly.
Pre - installation Checks
Before you even start the installation process, there are a few crucial checks you need to do. First off, inspect the hose thoroughly. Look for any visible signs of damage like cuts, abrasions, or bulges. If you find any issues, don't use the hose. A damaged hose can lead to leaks and failures during operation, which can be a real headache.
Next, check the fittings. Make sure they are the right size and type for your hose. The fittings should be clean and free from any debris or rust. If the fittings are not in good condition, it can affect the seal between the hose and the equipment, leading to leaks.
Also, measure the installation area. You need to ensure that the hose has enough space to be installed without being bent too sharply. Sharp bends can restrict the flow of the dredged material and cause excessive wear on the hose.
Gathering the Right Tools
You'll need the right tools for a successful installation. Some of the basic tools you'll need include wrenches, clamps, and a measuring tape. The wrenches are used to tighten the fittings, and the clamps are used to secure the hose to the equipment. A measuring tape helps you make sure that the hose is cut to the right length.
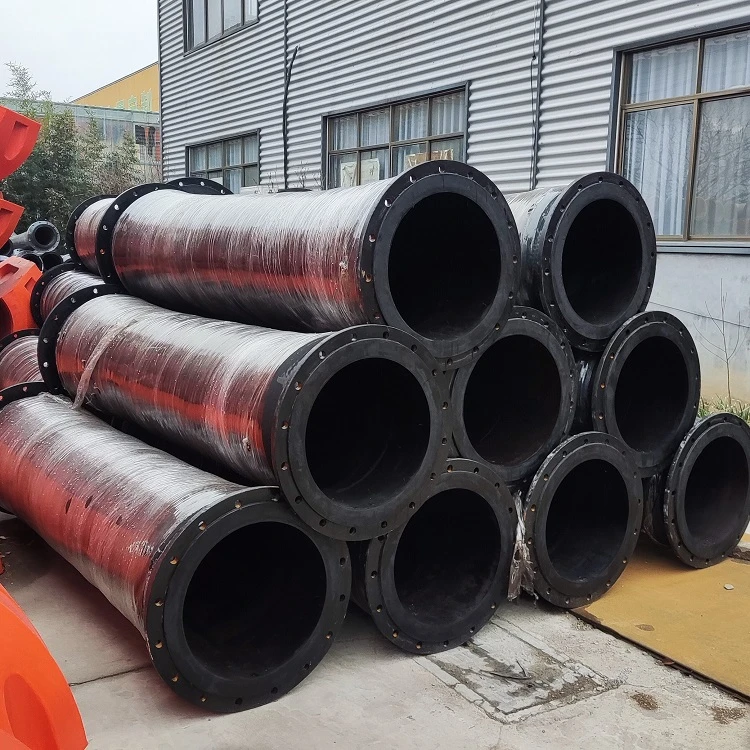
If you're working with a large - diameter hose, you might also need a crane or a hoist to lift and position the hose. Safety equipment like gloves and goggles are also a must - have to protect yourself during the installation process.
Cutting the Hose to the Right Length
Once you've done your pre - installation checks and gathered your tools, it's time to cut the hose to the right length. Use a sharp knife or a hose cutter to make a clean cut. A ragged cut can cause problems with the fitting and the seal.
Measure the distance between the two connection points on your dredging equipment and add a little extra length to account for any bends or curves in the hose. It's better to have a slightly longer hose than a short one, as you can always trim it later.
Attaching the Fittings
Now, it's time to attach the fittings to the hose. First, lubricate the inside of the fitting and the end of the hose. This makes it easier to slide the fitting onto the hose. You can use a silicone - based lubricant for this purpose.
Slide the fitting onto the hose until it's fully seated. Make sure that the fitting is centered on the hose and that there are no gaps between the fitting and the hose. Then, use the appropriate clamps to secure the fitting to the hose. Tighten the clamps evenly to ensure a good seal.
Installing the Hose
With the fittings attached, it's time to install the hose on your dredging equipment. If you're using a crane or a hoist, carefully lift the hose into position. Make sure that the hose is aligned correctly with the connection points on the equipment.
Slide the hose onto the connection points on the equipment. If there are any alignment pins or keys, make sure they are properly engaged. Then, use the wrenches to tighten the nuts or bolts on the fitting to secure the hose to the equipment.
Testing the Installation
After the hose is installed, it's important to test the installation. Fill the hose with water or a test fluid and check for any leaks. Look closely at the connection points between the hose and the equipment and the joints between the hose and the fittings.
If you find any leaks, tighten the clamps or the fittings a little more. If the leak persists, you might need to remove the hose and check the fitting or the hose for damage.
Maintenance Tips
Once the hose is installed and tested, it's important to maintain it properly. Regularly inspect the hose for any signs of wear or damage. Check the clamps and the fittings to make sure they are still tight.
Keep the hose clean and free from debris. If the hose is exposed to harsh chemicals or abrasive materials, consider using a protective cover.
Types of Dredging Rubber Hoses
There are different types of dredging rubber hoses available, each with its own features and applications. For example, the Dredging Discharge Rubber Hose is designed to handle the discharge of dredged materials. It's made of high - quality rubber that can withstand the abrasion and wear caused by the flowing material.
The Flexible Dredge Rubber Hose is more flexible, which makes it ideal for applications where the hose needs to bend or move. It's often used in situations where the dredging equipment needs to be repositioned frequently.
And if you need different sizes of hoses, the Differenct Size Discharge Rubber Hose offers a range of options to suit your specific requirements.
Conclusion
Installing a dredging rubber hose correctly is not rocket science, but it does require attention to detail. By following the steps outlined above, you can ensure a successful installation that will keep your dredging equipment running smoothly.

If you're in the market for high - quality dredging rubber hoses, we're here to help. We offer a wide range of hoses and fittings to meet your needs. Whether you're working on a small - scale dredging project or a large - scale industrial operation, we've got you covered. Contact us for more information and to discuss your specific requirements. We're always happy to help you find the right solution for your dredging needs.
References
- Dredging Equipment Handbook
- Rubber Hose Manufacturer's Manuals